오늘은 Spring Boot 환경에서 에러 로그 모니터링을 하는 방법에 대해서 설명해보겠습니다.
개발이 완료된 서버를 운영환경에 배포하면, 서버가 잘 동작하고 있는지, 에러가 발생한다면 해당 에러는 어디서 발생하는지 확인이 필요합니다. 그래서 오늘은 이슈 트래킹을 할 수 있는 Sentry를 Spring Boot와 연동해보겠습니다.
이번 포스팅은 연동관련 된 내용만 다룹니다. Sentry에 대한 자세한 내용은 다음 포스팅을 참고해주세요!
[DevOps] 로그 수집 및 모니터링 시스템 - Sentry (1탄)
[DevOps] 로그 수집 및 모니터링 시스템 - Sentry (2탄)
먼저 Sentry 프로젝트를 다음과 같이 만듭니다.
1. create project 클릭
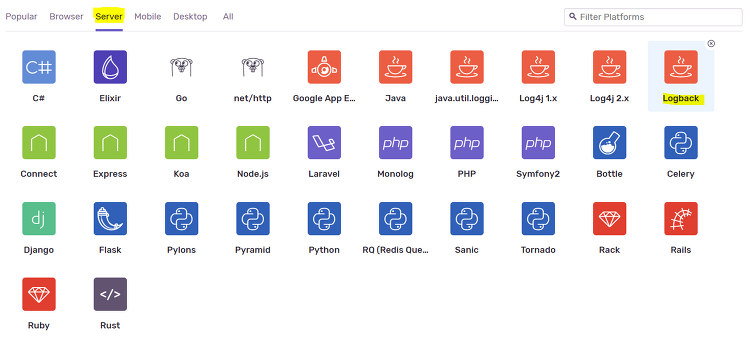
2. server 탭 클릭
3. LogBack 클릭 후 프로젝트 명을 작성하고 프로젝트를 생성합니다.

그 후 Spring Boot 프로젝트에 Sentry Logback 라이브러리를 붙여줍니다.
[ Maven pom.xml ]
<dependency>
    <groupId>io.sentry</groupId>
    <artifactId>sentry-logback</artifactId>
    <version>1.7.23</version>
</dependency>
[ Gradle build.gradle ]
compile 'io.sentry:sentry-logback:1.7.23'
Spring Boot 에서 application.yml 또는 application.properties 에서 Logging에 대한적인 설정이 가능하지만
직접 src/main/resources (classpath) 하위에 logback.xml 파일을 생성하여 logback 설정이 가능합니다.
또한 logback.xml 이 아니라 logback-spring.xml 이라는 이름으로 파일을 생성하면, logback-extension 기능을 사용할 수 있습니다. logback-extension 주요 기능 중에 spring profile을 기반으로 로그 설정을 달리 할 수 있는 기능이 있습니다.
저는 운영환경에서 발생하는 에러만 Sentry로 수집하고 싶었기에 다음과 같이 logback-spring.xml 파일을 생성했습니다.
<?xml version="1.0" encoding="UTF-8"?>
<configuration>

    <!-- Configure the Console appender -->
    <appender name="Console" class="ch.qos.logback.core.ConsoleAppender">
        <encoder>
            <pattern>%magenta([%d{yyyy-MM-dd HH:mm:ss}]) - %highlight([%-5level]) - %green([%logger{35}]) - %msg%n</pattern>
        </encoder>
    </appender>

    <!-- Configure the Sentry appender, overriding the logging threshold to the WARN level -->
    <appender name="Sentry" class="io.sentry.logback.SentryAppender">
        <filter class="ch.qos.logback.classic.filter.ThresholdFilter">
            <level>WARN</level>
        </filter>
    </appender>

    <!-- Enable the Console and Sentry appenders, Console is provided as an example
 of a non-Sentry logger that is set to a different logging threshold -->
    <springProfile name="test">
        <root level="INFO">
            <appender-ref ref="Console"/>
        </root>
    </springProfile>

    <springProfile name="production">
        <root level="INFO">
            <appender-ref ref="Console"/>
            <appender-ref ref="Sentry"/>
        </root>
    </springProfile>

    <springProfile name="local">
        <root level="INFO">
            <appender-ref ref="Console"/>
        </root>
    </springProfile>
</configuration>
io.sentry.logback.SentryAppender 클래스를 활용하여 Sentry 라는 이름으로 WARN 이상의 레벨의 로그를 수집하는 Appender를 생성했고, springProfile 태그를 활용하여, profile이 test, local, production일 때를 구분하여 Appender를
붙여 로그 설정을 다르게 했습니다.
이렇게 Sentry Logback 설정을 완료했습니다. 다음 설정은 Sentry 라이브러리가 Sentry 프로젝트의 DSN 주소 또는 로그 수집 관련 된 설정값을 읽어 올 수 있도록 src/main/resources (classpath) 하위에 sentry.properties 라는 이름으로 파일을 생성합니다. 그리고 다음과 같이 설정합니다.
dsn=DSN 주소값 # 현재 프로젝트에서 수집될 로그가 저장되는 Sentry 프로젝트의 DSN 주소를 입력합니다.
servername=server # 수집되는 프로젝트 명을 입력합니다.
stacktrace.app.packages=com.example.admin.* # 반드시 들어가야하는 설정값으로, 에러 발생시 Stacktrace를 수집할 범위를 설정합니다.
이제 Spring Boot 프로젝트에서 Sentry를 활용하기 위한 모든 설정은 끝났습니다. 프로젝트를 빌드 시키고 에러가 발생하면 다음과 같이 Sentry 프로젝트에 에러가 수집됩니다.

'Programming > Spring' 카테고리의 다른 글
| [SpringBoot] Redis Channel Subscribe with MessagePack (0) | 2019.09.18 |
|---|---|
| [SpringBoot] Redis Publish Channel Subscribe (0) | 2019.09.18 |
| [Spring Boot] @Schedule로 스케줄 프로그래밍 하기 (0) | 2019.08.22 |
| [SpringBoot] LocalDateTime Json Serialized (2) | 2019.06.19 |
| Spring Boot Logging (Convert To JSON Format) (2) | 2019.05.27 |
오늘은 Spring Boot 환경에서 에러 로그 모니터링을 하는 방법에 대해서 설명해보겠습니다.
개발이 완료된 서버를 운영환경에 배포하면, 서버가 잘 동작하고 있는지, 에러가 발생한다면 해당 에러는 어디서 발생하는지 확인이 필요합니다. 그래서 오늘은 이슈 트래킹을 할 수 있는 Sentry를 Spring Boot와 연동해보겠습니다.
이번 포스팅은 연동관련 된 내용만 다룹니다. Sentry에 대한 자세한 내용은 다음 포스팅을 참고해주세요!
[DevOps] 로그 수집 및 모니터링 시스템 - Sentry (1탄)
[DevOps] 로그 수집 및 모니터링 시스템 - Sentry (2탄)
먼저 Sentry 프로젝트를 다음과 같이 만듭니다.
1. create project 클릭
2. server 탭 클릭
3. LogBack 클릭 후 프로젝트 명을 작성하고 프로젝트를 생성합니다.

그 후 Spring Boot 프로젝트에 Sentry Logback 라이브러리를 붙여줍니다.
[ Maven pom.xml ]
<dependency>
    <groupId>io.sentry</groupId>
    <artifactId>sentry-logback</artifactId>
    <version>1.7.23</version>
</dependency>
[ Gradle build.gradle ]
compile 'io.sentry:sentry-logback:1.7.23'
Spring Boot 에서 application.yml 또는 application.properties 에서 Logging에 대한적인 설정이 가능하지만
직접 src/main/resources (classpath) 하위에 logback.xml 파일을 생성하여 logback 설정이 가능합니다.
또한 logback.xml 이 아니라 logback-spring.xml 이라는 이름으로 파일을 생성하면, logback-extension 기능을 사용할 수 있습니다. logback-extension 주요 기능 중에 spring profile을 기반으로 로그 설정을 달리 할 수 있는 기능이 있습니다.
저는 운영환경에서 발생하는 에러만 Sentry로 수집하고 싶었기에 다음과 같이 logback-spring.xml 파일을 생성했습니다.
<?xml version="1.0" encoding="UTF-8"?>
<configuration>

    <!-- Configure the Console appender -->
    <appender name="Console" class="ch.qos.logback.core.ConsoleAppender">
        <encoder>
            <pattern>%magenta([%d{yyyy-MM-dd HH:mm:ss}]) - %highlight([%-5level]) - %green([%logger{35}]) - %msg%n</pattern>
        </encoder>
    </appender>

    <!-- Configure the Sentry appender, overriding the logging threshold to the WARN level -->
    <appender name="Sentry" class="io.sentry.logback.SentryAppender">
        <filter class="ch.qos.logback.classic.filter.ThresholdFilter">
            <level>WARN</level>
        </filter>
    </appender>

    <!-- Enable the Console and Sentry appenders, Console is provided as an example
 of a non-Sentry logger that is set to a different logging threshold -->
    <springProfile name="test">
        <root level="INFO">
            <appender-ref ref="Console"/>
        </root>
    </springProfile>

    <springProfile name="production">
        <root level="INFO">
            <appender-ref ref="Console"/>
            <appender-ref ref="Sentry"/>
        </root>
    </springProfile>

    <springProfile name="local">
        <root level="INFO">
            <appender-ref ref="Console"/>
        </root>
    </springProfile>
</configuration>
io.sentry.logback.SentryAppender 클래스를 활용하여 Sentry 라는 이름으로 WARN 이상의 레벨의 로그를 수집하는 Appender를 생성했고, springProfile 태그를 활용하여, profile이 test, local, production일 때를 구분하여 Appender를
붙여 로그 설정을 다르게 했습니다.
이렇게 Sentry Logback 설정을 완료했습니다. 다음 설정은 Sentry 라이브러리가 Sentry 프로젝트의 DSN 주소 또는 로그 수집 관련 된 설정값을 읽어 올 수 있도록 src/main/resources (classpath) 하위에 sentry.properties 라는 이름으로 파일을 생성합니다. 그리고 다음과 같이 설정합니다.
dsn=DSN 주소값 # 현재 프로젝트에서 수집될 로그가 저장되는 Sentry 프로젝트의 DSN 주소를 입력합니다.
servername=server # 수집되는 프로젝트 명을 입력합니다.
stacktrace.app.packages=com.example.admin.* # 반드시 들어가야하는 설정값으로, 에러 발생시 Stacktrace를 수집할 범위를 설정합니다.
이제 Spring Boot 프로젝트에서 Sentry를 활용하기 위한 모든 설정은 끝났습니다. 프로젝트를 빌드 시키고 에러가 발생하면 다음과 같이 Sentry 프로젝트에 에러가 수집됩니다.

'Programming > Spring' 카테고리의 다른 글
| [SpringBoot] Redis Channel Subscribe with MessagePack (0) | 2019.09.18 |
|---|---|
| [SpringBoot] Redis Publish Channel Subscribe (0) | 2019.09.18 |
| [Spring Boot] @Schedule로 스케줄 프로그래밍 하기 (0) | 2019.08.22 |
| [SpringBoot] LocalDateTime Json Serialized (2) | 2019.06.19 |
| Spring Boot Logging (Convert To JSON Format) (2) | 2019.05.27 |
